
Learn Marketing and Content Creation from Jon Leger

As bloggers and online marketers, we can all appreciate the need for creating content, gaining backlinks and being able to effective monetize our audience. In most cases, the content we create is for our own blogs and we may even write these occasional guest blog post or two. For online marketers and link specialists, content […]
Continue reading
Blog Commenting for networking ~ How to stand tall

Commenting is an interesting blogging activity. Some bloggers comment on other blogs for direct traffic. Others do it for SEO but the winners are those who comment for networking. When you network with the right people in your niche, you end up getting traffic and SEO benefits from these connections. That’s why I can boldly […]
Continue reading
How Loading Time Affects Your Blogs Revenue

The loading time and speed of your blog isn’t measured simply by how long visitors are waiting to read your content, it’ also affects your bottom line as well. This isn’t just about earnings, but also how many people are leaving your site because it’s taking too long to load, a loss in potential revenue […]
Continue reading
Landing Page Optimization Guide [Infographic]

When you think of the word ‘landing pages’, you probably think of online marketing and more specifically ‘affiliate marketing’. This is a common misconception. Landing pages are actually used all over the place, and very often by bloggers as well. Just the other day I wrote a post on five ways bloggers should be using […]
Continue reading
5 Reasons Why Bloggers Need Landing Pages

You already have a blog, so why would you need a landing page too? If this is a question you are asking, then you probably need to start using landing pages more than you think! By the time you are finishing reading through this article, you are going to truly appreciate the value and need for […]
Continue reading
$50 or More Per Guest Post

There are two major challenges bloggers face, and they are; getting people to read their work and making money. In the past few years, guest blogging came to prominence for solving the former (getting people to read your work) but the latter is still a major challenge for most bloggers. Not anymore. Now, you can […]
Continue reading
10 Extremely Effective Social Media Tools For Bloggers

We are well aware that bloggers are different than marketers. Some of them do not prefer putting the texts out there, trying hard to attract more visitors. But honestly, this is a big mistake. In 21st century, there are so many websites and blogs, that readership often feels lost. People need guidance and social media marketing is one […]
Continue reading
Track and Monitor Blog Search Rankings with Rankinity
Everyone wants to have a successful blog that gets a lot of traffic and ranks at the top of the search results. While this is something everyone wants, it’s usually not something many people can accomplish. This is usually due to the many facets of creating content, ranking in the search results and measuring your […]
Continue reading
How to Improve Your Blog Writing Skills

Blog writing is a very delicate matter. Some people treat it as a hobby, while others make money on it. Obviously, everyone wants to improve the popularity of his blog. It does not worth mentioning that this process requires patience, creativity and good essay writing skills. In addition, one should be a good manager and […]
Continue reading
10 Resources for Bloggers Who Want to Take Their Blog to the Next Level

Blogging resources can be powerful. If you find the right blogging tool, it can effectively improve your website’s performance. The only problem is, there are so many resources available for bloggers. It is not easy to pick the right tools to take your blog to the next level. Over the years, I’ve used so many […]
Continue readingSimple Sites Big Profits: Profiting with Niche Sites

If most people had the choice to put hard work towards something quickly that would continue to generate big profits, they would jump at the chance to do so. Marcus Campbell’s Simple Sites Big Profits online course was designed to teach students how to do just that. Simple Sites Big Profits gives users step-by-step instructions […]
Continue reading
How to Create a Web Site with IM Creator’s XPRS Builder

Remember the first time you started a web site or blog of your own? If it was several years ago, you probably had the joy of creating your site in one program, designing and coding it in another then uploading the site through FTP to your server. After that, all of the images would be […]
Continue reading
3 Reasons Your Link Building Strategies Won’t Help Your Search Engine Ranking

Among the over 200 Google ranking signals, quality and trusted incoming links are the firepower that incredibly increase search engines ranking; with domain-level link authority and page-level link features sharing 40% of total ranking factors between them. The more relevant, quality, trusted and authoritative links pointing back to your webpages, the more your chances of ranking high […]
Continue reading
Create Stunning Mockups in Seconds: Placeit Review

Sometimes things are almost easier to create in concept than they are to execute in reality; this is something that a lot of online marketers creating and developing apps have experienced. Creating mockups and videos for products like mobile apps have previously been a giant pain for online marketers to create. Now, however, thanks to […]
Continue reading
Enter to Win a $948 Annual Membership to AdsBridge

Whether you are a blogger or a full time affiliate marketer, landing pages and tracking the success of your ad campaigns is key. Gone are the days of needing to custom code your sites and landing pages, and so are the days of having to pay thousands of dollars per month for access to a […]
Continue reading
Will Help Your Traffic Shoot Through the Roof

Research from Hubspot has shown that businesses that blog receive 67% more leads than businesses that do not blog. That’s good news, but does it all end with starting a blog? Apparently, your content schedule matters, too. Data from Hubspot also revealed that 82% of businesses that blog daily acquired a customer through their blog, […]
Continue reading
List Building Profit Review – How to Grow Your Mailing List

Running a blog and website takes a lot more than just frequently posting great content. A lot of times, content marketing can be a means to an end, as it allows you to collect visitors’ e-mail information through link building, which then gives you the opportunity to target them through e-mail marketing. Almost everyone has […]
Continue reading
How to Use Demographic Targeting and Infographics to Create Blog Content

Demographic targeting has been used by advertisers long before the Internet was even a thing. Demographic targeting is a compilation of information about a certain group of people that the advertiser wants to target, such as their age, income, education level, marital status and so on. Advertisers can home in on one group, such as […]
Continue reading
How To Get 1.3 Million Visitors Per Month From Google (Free Video Training)

If you want to increase traffic to your website then pay attention to what I’m about to tell you. I have spent the past decade fighting swords with Google on the SEO battle front and built a multi award winning blog at the same time by sharing my strategies. Zac has been kind enough to […]
Continue reading
Due to Lot of changes day by day in Blogger.com interface and its features, it comes in my mind I should update this article for providing exact and updated information about how to create blog on blogger.com (blogspot) with new interface and tell you about its best features to get well experience and most out.

Check Out the Best features you should know about blogger.com
Blogger Basics
Launched in 1999, Blogger, Google Service, is a great way to create your own blog to start. Blogger completely free with free hosting.
Blogger is for:To share your thoughts, photos, and more with friends and the world.
Easy to deploy text, images and videos and the Internet or from your mobile phone.
Unlimited resilience to customize your blog with themes, tools, and more. There is also some site which provides online blogging courses from which you will learn complete blogging, how do I blog and start make money from your blog with traffic and the help of SEO (Search Engine Optimization)
How to Create Blog on Blogger (Blogspot) New Interface
Step 1: Sign Up for a Google Account
You will need a Google account to build your own blog on Blogger. If you already have one, you do not need to create a new account, simply follow these steps.
Step 2: Go to Blogger.com then Sign In

How to create blog on blogger new interface
and Insert Your blog URL address in the second field i.e. my-personal-photo .blogspot.com
In last select any theme from the templates section and click on the Create Blog Button.
finally you have created your free blog on blogger and thereafter its take you to Blogger dashboard. check the following screenshot

Blogger Dashboard New Interface
Enable Meta Description for Blogger Blog
This is the major issue which is mostly avoided by newbie and they still don’t know what is it. but after lot of changes in Search Engines algorithm and SEO factors this information must be shared with all blogspot user to enable meta description for your blogspot blog and every post.
How to enable meta tags description in blogspot
How to Write Post in Blogger.com
Some newcomers still unaware how to create post in blogger because I have found and notified some blogger are creating pages instead of blog post. Check the above screenshots there is an orange button of New Post click on it and you will see the following page where you have to write your article or any post for your blog.
How to Create Post in Blogger new interface
Creating Writing Tips for Blogging
Add Blog Description
You can easily add or change your Blog title and add brief description for your blog. Check this screenshot
How to Change Blog Title and Description in Blogger
How To Create Page on Blogger
Check the Following Screenshot for creating pages on Blogger Blog.
How to create pages in Blogger
Check Traffic Stats in Blogger Dashboard
For checking blog traffic you don’t have to use third-party tool or any other stats website, Just use your Blogger Dashboard and check all out stats of your blog. Go to Stats tab and check traffic sources, traffic per post, audiences location easily from single click.
How to Check Blogspot Traffic Stats
mated Flash Clock To Your Blogger Blog

Hello! `How are you guys? here's the cool Clock.this tutorial will show you how to Add animated flash clock gadget your Blogger blog. A clock gives a beautiful look to a website. A clock is a necessity for a personal website, forum, blog etc.Isn’t it exciting when you get a highly quality flash Clock absolutely Free? you can add this flash animated clock your blog easily.i've tested this Flash Clock on internet explorer, mozzilla firefox & many other web browsers. it's very fast and fresh.You simply have to copy the code below each clock and add it to your blog.
How To Add Aniamted Flash Clock Widget To Blogger?
- Choose a type of clock below
- Provide Require widget title
- Fill Height and Width of the Widget
- Click on "Genetate" button
- Finally click on "Add to Blogger" to add it to your blog.
Add Animated Flash Clock To Your Blogger blog
Now let's start adding it...
Step 1. Login to Your Blogger Account.Go to your Blogger Dashboard.Click on Layout tab from left pane and click on Add a Gadget link.

Step 2. After click on Add a Gadget link A pop-up box will open now
with many gadget list, Choose HTML/JavaScript from the gadget options by clicking the blue plus sign for that gadget.

Step 3. Select 'HTML/Javascript' and add the one of code given below.
Step 4. Now Click On Save 'JavaScript' You are done.
Happy blogging!
Special Thanks http://flash-clocks.com
Picture From http://www.2dayblog.com/2009/10/19/manual-digital-clock/

tips to reduce blog loading time
Today I am gonna discuss with you a most essential SEO factor which surely can help you to increase blog ranking and boost blog traffic. Blog load time is most important SEO factor and every bloggers and webmasters should care their blog’s loading time and most of always try to reduce it. Because readers don’t like those sites which take too much time to load and than finally readers go to another website for searching the information. If your blog load faster than obviously many major search engine consider your blog as a good ranking especially Google. Reduce blog load time better helps for search engine and also your visitors/readers.
9 Tips To Reduce Blog Loading time
Below are some most important tips about how to reduce blog or wordpress loading time. Which you should consider and use it for better ranking.How To Check Blog Or Website Loading Speed?
I have some best tool which you can check blog time speed and can improve performance.Go to PageSpeed Insights and check blog load time.
1. Don’t Use Unnecessary JavaScript Coding:
Avoid using unnecessary JavaScript coding in blog it makes page load time slow Because it is so much heavy coding and can effect blog load time by a great margin. Most of newbie bloggers and webmasters use unnecessary widgets in their blog sidebar which is really harmful.2. Choose Your Blog Template Wisely:
Select a clean and SEO friendly theme it is an amazing choice for blog. Before choosing a blog theme make sure that JavaScript usage not too much and don’t choose such type of blog theme which is already over designed.3. Minimum Number Of Post On Blog Home Page:
Don’t show too much posts on blog homepage because it may possibility effect and helps to raise loading time. Always try to show 5 to 8 posts on homepage for better SEO ranking. If your website load faster than definitely readers will stay and glad. So avoid to show too much posts.4. Avoid Too Much Optimize Images In A Single Post:
Relevant images in a single post is obviously play vital role for improve SEO ranking. But make sure 3 to 4 images is enough in a single post. Avoid too much use images per post because every image has use separate memory capacity.Add Auto Image ALT Tag Generator for Blogspot Blogger
5. Use Resize Images:
Don’t forget to resize blog images with any resize image editor. Always Use JPG images because JPG images uses less size memory as compare to other images formats. To resize images use Photoscap or Photoshop.6. Avoid To Display Too Many Ads On Blog:
I have seen most of newbie bloggers join many CPC networks program and implement all ads inside their blog which ads banner coded with JavaScript which full of use heavy size memory and can slow blog loading speed which is bad impact for SEO ranking. So please don’t use to many ads.7. Avoid To Display Popup Ads:
There are dozens of blog sites which are exists in Google search engine who are display popup ads in their blog to increase earning. But as I recommended, It is a bad way to increase revenue. I have seen many time that such blogs or websites are not loaded, But it is hang by popup advertising campaign. So totally avoid to display it.8. Avoid To Use Unnecessary External Links:
In case you are using stats counters widget to check blog traffic and also use website welcome widget in blog site. You may use Google analytic tools instead of stats counters widget and you have to remove unnecessary website welcome widget into blog.9. Avoid to Using Unnecessary Social Media Buttons:
Social media buttons is most important which helps blog to increase traffic. Social media sites also help us to connect with world. But you may remove unnecessary social media buttons.Final Words:
Step 1: Sign Up for a Google Account
You will need a Google account to build your own blog on Blogger. If you already have one, you do not need to create a new account, simply follow these steps.
Step 2: Go to Blogger.com then Sign In
How to create blog on blogger new interface
and Insert Your blog URL address in the second field i.e. my-personal-photo .blogspot.com
In last select any theme from the templates section and click on the Create Blog Button.
finally you have created your free blog on blogger and thereafter its take you to Blogger dashboard. check the following screenshot
Blogger Dashboard New Interface
Enable Meta Description for Blogger Blog
This is the major issue which is mostly avoided by newbie and they still don’t know what is it. but after lot of changes in Search Engines algorithm and SEO factors this information must be shared with all blogspot user to enable meta description for your blogspot blog and every post.How to enable meta tags description in blogspot
How to Write Post in Blogger.com
Some newcomers still unaware how to create post in blogger because I have found and notified some blogger are creating pages instead of blog post. Check the above screenshots there is an orange button of New Post click on it and you will see the following page where you have to write your article or any post for your blog.How to Create Post in Blogger new interface
Creating Writing Tips for Blogging
Add Blog Description
You can easily add or change your Blog title and add brief description for your blog. Check this screenshotHow to Change Blog Title and Description in Blogger
How To Create Page on Blogger
Check the Following Screenshot for creating pages on Blogger Blog.How to create pages in Blogger
Check Traffic Stats in Blogger Dashboard
For checking blog traffic you don’t have to use third-party tool or any other stats website, Just use your Blogger Dashboard and check all out stats of your blog. Go to Stats tab and check traffic sources, traffic per post, audiences location easily from single click.How to Check Blogspot Traffic Stats
Custom Facebook Like Box To Blogger

How To Add a Custom Facebook Like Box to Your Site
Now let's start adding it...
Step 1. Login to Your Blogger Account.Go to your Blogger Dashboard.Click on Layout tab from left pane and click on Add a Gadget link.
Step 2. After click on Add a Gadget link A pop-up box will open now
with many gadget list, Choose HTML/JavaScript from the gadget options by clicking the blue plus sign for that gadget.
Step 3. Select 'HTML/Javascript' and add the one of code given below.
Step 4. Now Click On Save 'JavaScript' You are done.

Auf der "Startseite", Ihrem Dashboard, finden Sie in der linken Menüleiste alle wichtigen Funktionen:
- Der erste Punkt "Neuer Post" führt Sie direkt zum Textfeld für einen neuen Blogeintrag. Mehr dazu im nächsten Absatz.
- Posts: Hier finden Sie alle Blogeinträge in einer Liste und können ältere Posts bearbeiten, löschen und von der Webseite nehmen oder sich die Zugriffszahlen der einzelnen Artikel ansehen.
- Seiten: Fügen Sie verschiedene "Seiten" ein, können Sie Ihren Blog in Abschnitte gliedern. Der Unterschied zwischen "Seite" und "Posts" besteht lediglich in der Anordnung: Seiten sind nämlich (je nach Layout) im linken oder oberen Menü angeheftet.
- Kommentare: Einzelne Blogeinträge können von Usern kommentiert werden. Die Kommentare müssen Sie hier freischalten.
- Google+: Ihr Blog ist mit Ihrem Google-Plus-Account verknüpft. Alle neuen Beiträge werden dort automatisch gepostet, dies können Sie hier jedoch auch deaktivieren.
- Statistiken: Wer hat wann von wo mit welchem Gerät Ihren Blog angesehen? Unter "Statistiken" finden Sie es heraus. Wird der Blog fast nur von Smartphones angesehen, sollten Sie die Inhalte auch für die mobile Ansicht optimieren.
- Einnahmen: Gute Blogs sind eine kleine Geldquelle, zumindest wenn Sie Werbung schalten. Wie Sie dazu vorgehen, lesen Sie hier.
- Layout: Menüs, den Header und viele Gadgets für Ihren Blog können Sie hier ändern. Tolle Features von Facebook, twitter und Co stellen wir Ihnen in den nächsten Absätzen vor.
- Vorlage: Die Vorlage konnten Sie bereits bei der Erstellung des Blogs auswählen – jetzt können Sie dies noch einmal ändern und ins Detail gehen. Schriftart, Farben, Hintergrund und auch das HTML-Skript des Blogs ändern Sie in diesem Abschnitt.
- Einstellungen: Einen Vertipper im Namen können Sie hier ebenso leicht ändern wie die Blogbeschreibung und die Blog-URL. Zudem bestimmen Sie hier die Anzahl der Posts auf der Startseite, nehmen Einstellungen zu den Kommentaren vor und können die Blog-Beschreibung für Google eintragen.

Als erstes müssen Sie natürlich einen Blog erstellen. Haben Sie dies bereits getan, können Sie zum nächsten Abschnitt springen.
- Melden Sie sich bei Google an oder erstellen Sie einen neuen Account. Anschließend müssen Sie Blogger öffnen.
- Dort erstellen Sie über "Neuer Blog" eine neue Website, für die Sie noch einen Hintergrund und ein Layout auswählen müssen. Beides können Sie später jedoch wieder ändern.
- Geben Sie noch einen Blog-Namen ein und klicken Sie auf " Blog erstellen"
By default, your blog is completely public, and can be read by anyone on the internet. However, if you want to keep it private, you can do that, too. You can change these settings on the Settings | Basic tab.
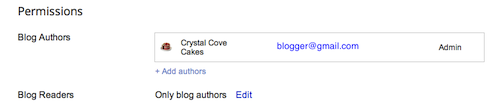
- Under the 'Blog Readers' section, you'll probably see 'Anybody' selected as the default. When you change this to 'Only these readers,' you'll get an Add Readers button.
- Click the Add Readers button and then enter the email address of a person to whom you'd like to grant access to your blog. To add multiple people, separate their addresses with commas.
- For each address entered, the Google Account associated with that address will be given access to view your blog. If an address is not associated with an account, that person will receive an invitation email with a link allowing them do one of three things:
- Sign in to an existing account.
- Create a new account.
- View your blog as a guest (no account required).
Your template is a fun way to customize your blog. When creating a new blog, you're first asked to choose a default template, this is the basic design of your blog. You can choose from many templates for your blog; simply pick the one that best fits your needs.
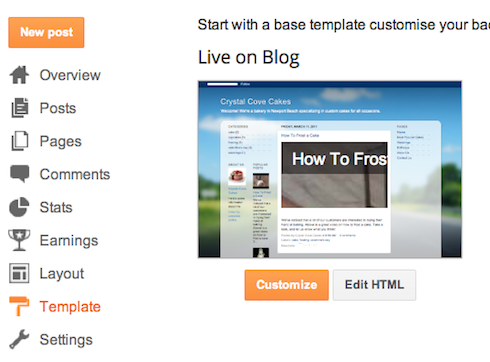 Once on the Template tab, you can either click on the orange Customize button to get started with our easy-to-use WYSIWYG (“What you see is what you get”) template designer, or choose one of our many default templates. If you’d like to edit the HTML of your blog, just click the gray Edit HTML button.
In addition, you can customize your blog's design using our intuitive drag-and-drop interface. You can also add powerful gadgets such as slideshows, user polls, or even AdSense ads. If you want more precise control over your blog's layout, you can also use the Edit HTML feature. To edit your blog's layout, follow these steps: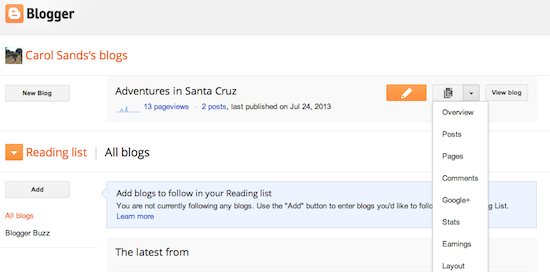
Once on the Template tab, you can either click on the orange Customize button to get started with our easy-to-use WYSIWYG (“What you see is what you get”) template designer, or choose one of our many default templates. If you’d like to edit the HTML of your blog, just click the gray Edit HTML button.In addition, you can customize your blog's design using our intuitive drag-and-drop interface. You can also add powerful gadgets such as slideshows, user polls, or even AdSense ads. If you want more precise control over your blog's layout, you can also use the Edit HTML feature. To edit your blog's layout, follow these steps:
- Click Layout from the drop-down menu on your dashboard below the blog you would like to customize.
- From there, click Edit to edit existing gadgets, or Add a Gadget to add new ones.
- To add a new gadget after you've clicked Add a Gadget, simply click the plus sign next to your desired gadget. You can choose from gadgets by category, or search for a specific gadget in the top right of the pop-up window.
- Once you've added the necessary information to your selected gadget, click the orange Save arrangement button. Your layout changes will appear instantly.

Once you've signed in to Blogger, you'll see your dashboard with your list of blogs. Here's what you need to do:
Once you've selected your image, you can then choose a layout to determine how your image will appear in your post:
You can also publish images to your blog using your mobile device, Google's free photo software Picasa, or a third-party service like flickr.
Back to top
Click Browse to select the video file from your computer that you'd like to upload. Note that Blogger accepts AVI, MPEG, QuickTime, Real and Windows Media files and that your video must be less than 100MB in size.
Before uploading your video, add a title in the 'Video Title' box and agree to the Terms and Conditions (you'll only have to do this the first time that you upload a video with Blogger). Then click UPLOAD VIDEO.
While your video uploads, you'll see a placeholder in the post editor showing where your video will appear. You'll also see a status message below the post editor letting you know that your upload is in progress. Depending on the size of your video, this usually takes about five minutes. When it is complete, your video will appear in the post editor.
- Click the orange pencil icon to write a new post, and enter anything you want to share with the world.
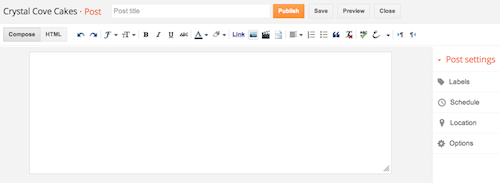
- Next, you'll see the Post Editor page. Start by giving your post a title (optional), then enter the post itself:
- When you're done, click the Preview button at the top to make sure it's ready to go, and then click the Publish button to publish your post.
Add an image
You can add an image from your computer or the Web to your blog. Click the image icon in the Post Editor toolbar. A window appears prompting you to browse for an image file on your computer, or enter the URL of an image on the Web.Once you've selected your image, you can then choose a layout to determine how your image will appear in your post:
- The 'Left', 'Center', and 'Right' options allow you to customize the way your blog text will flow around your image.
- The 'Image size' options will determine how large the image will appear within your post.
You can also publish images to your blog using your mobile device, Google's free photo software Picasa, or a third-party service like flickr.
Back to top
Add a video
To add a video to your blog post, click the film strip icon in the Post Editor toolbar above where you compose your blog text. A window appears prompting you to 'Add a video to your blog post.'Click Browse to select the video file from your computer that you'd like to upload. Note that Blogger accepts AVI, MPEG, QuickTime, Real and Windows Media files and that your video must be less than 100MB in size.
Before uploading your video, add a title in the 'Video Title' box and agree to the Terms and Conditions (you'll only have to do this the first time that you upload a video with Blogger). Then click UPLOAD VIDEO.
While your video uploads, you'll see a placeholder in the post editor showing where your video will appear. You'll also see a status message below the post editor letting you know that your upload is in progress. Depending on the size of your video, this usually takes about five minutes. When it is complete, your video will appear in the post editor.
